<< Previous Article: 8 Next Article: Coming Soon >>The Basics of Solar Imaging
By: Brian Ventrudo and Manish PanjwaniDiscuss this article in the forums
August 17, 2017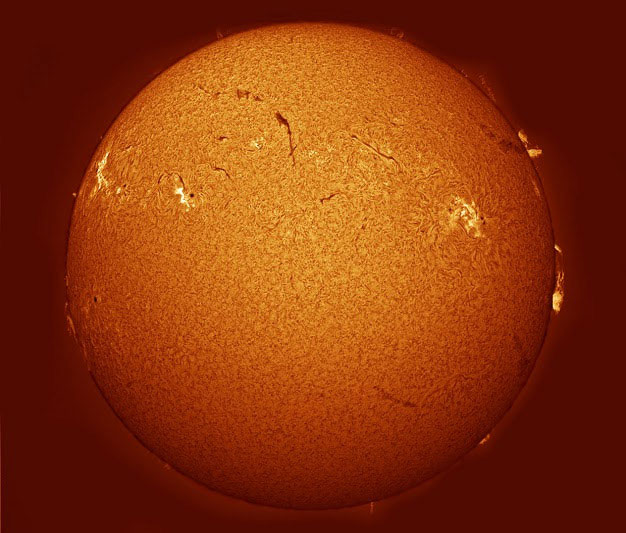 Figure 1-1: The Sun as imaged with a hydrogen-alpha solar filter. The image shows emission of light by hydrogen gas in the Sun's chromosphere at a wavelength of 656.3nm. Credit: Sergio Castillo.
9.1 Overview
Visual observation of the Sun, whether in white-light or in narrow band like H-alpha, rewards the observer with ever changing and close-up views of a major star in action. Features like sunspots, solar flares and prominences, faculae and tiny spicules are fascinating to watch. And special events such as planetary transits or total and partial solar eclipses add to the pleasure of amateur solar astronomy. Eventually, however, there comes a time when you wish to record your observations by capturing images of the Sun. In this article, you get a few tips and suggestions to get you started imaging the Sun with white-light solar filters and narrow-band solar filters such as H-alpha and Ca-K.
9.2 Imaging the Sun with a Smartphone or Point-and-Shoot Camera
Aiming an unfiltered camera at the Sun for any length of time may cause damage to the sensor, so it's essential to have a solar filter in front of the camera to completely cover the lens and keep the light to a safe level for the camera sensor and your eye. Filters such as solar eclipse cards or eclipse glasses reduce the intensity of the Sun's light by a factor of 100,000 or more, but they still give a sufficiently bright image for the camera's sensor. You can manually hold these simple filters in front of a smartphone or point-and-shoot while imaging. However, using only a solar filter and camera results in a very small image of the Sun's disk, even with zoom lenses of 200mm to 300mm focal length (35mm equivalent). So you're not likely to see any solar features such as sunspots using most smartphones and small camera.
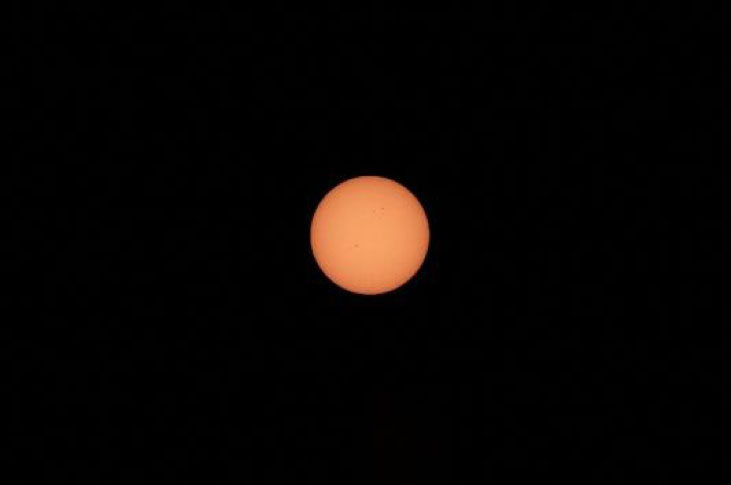 Figure 2-1: An uncropped image of the Sun with a DSLR camera with APS-C sensor and a 400mm lens (which is a 640mm equivalent to a full-frame DSLR camera). Solar film was used over the aperture of the lens. Credit: Sergio Castillo/Agena AstroProducts.
Afocal imaging, in which you snap an image of the Sun through the eyepiece of a properly filtered telescope, offers a solution and you can get a reasonably good solar image with this approach with a smartphone, small camera, or even a DSLR.
To do afocal imaging, you adjust the focuser of your telescope to achieve a good visual solar image in your eyepiece, then simply hold your camera up to the eyepiece, adjust the camera focus to get a sharp image in the viewfinder or on the screen, and take the picture. You can hold the camera by hand, but to get the best results, invest in a mechanical holder that secures the smartphone or camera to the focuser of the telescope to keep the camera in place and stationary as the image is taken. Heavier point and shoot cameras or DSLRs with a lens can be placed on a camera tripod and moved close to the telescope eyepiece of the telescope. If possible, use a timer or remote shutter release to take the image with the camera or phone without having to touch it. As with any sort of imaging through a telescope, a solid mount helps with getting a sharp image. Because camera shutter times are fairly fast for solar afocal imaging, a tracking mount is not critical.
WARNING: Do not try afocal imaging with a telescope without using a proper solar filter over the objective lens or mirror of the telescope. It's dangerous to handle an unfiltered telescope when pointing it towards the Sun, and you may damage your eyes inadvertently. You will surely damage the sensor of your smartphone or camera if it's exposed to unfiltered and highly intense and tightly focused light from a telescope.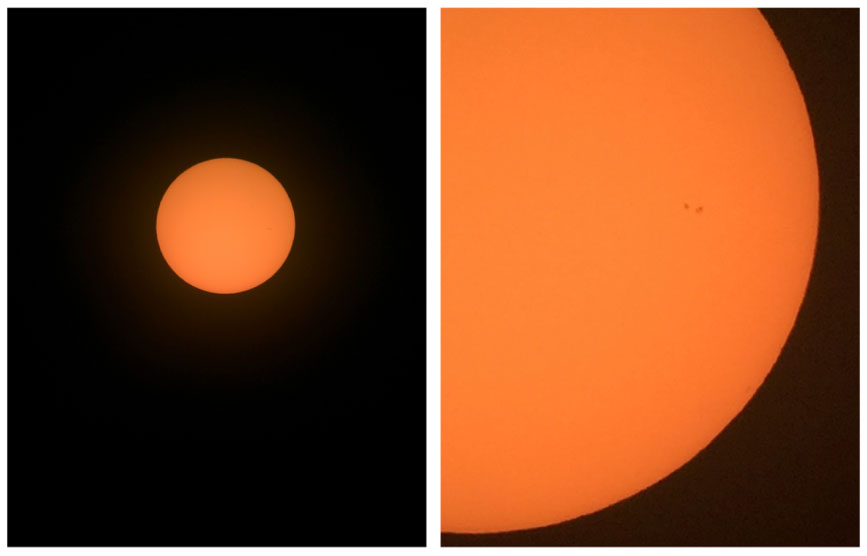 Figure 2-2: Uncropped afocal images of the Sun taken with a smartphone held with a holder/bracket at an eyepiece with focal length of 18.2mm and a telescope with 80mm objective lens and focal length of 480mm. A polymer solar filter was used over the objective lens of the telescope. The image on the left was taken with the smartphone camera set to lowest zoom setting. The image on the right was taken with the smartphone camera set to highest zoom setting. The camera automatically set the exposure. Credit: Sergio Castillo/Agena AstroProducts.
With afocal solar imaging, you can adjust the camera's optical or digital zoom to get close-ups of the image produced by the eyepiece. You can also switch eyepieces in the telescope to change the magnification and true field of view.
As for camera settings, use ISO200 or 400 and set the widest possible aperture (ie. the lowest f-stop number such as f/2.8 or f/4). Try a range of exposure times. Since even the filtered Sun is quite bright, start with something in the range of 1/30s to 1/500s. Shorter exposures capture more detail of sunspots and other features on the face of the Sun in white light. If you are using an H-alpha solar filter or dedicated H-alpha solar telescope, then you can try short exposures to properly image the solar disk and longer exposures to reveal solar prominences, if they are present, along the limb of the Sun.
White-light solar images can be taken in the camera's standard color mode. However, if your camera has a black-and-white setting, give it a try. It may result in better focusing and image contrast of photospheric images like sunspots and faculae.
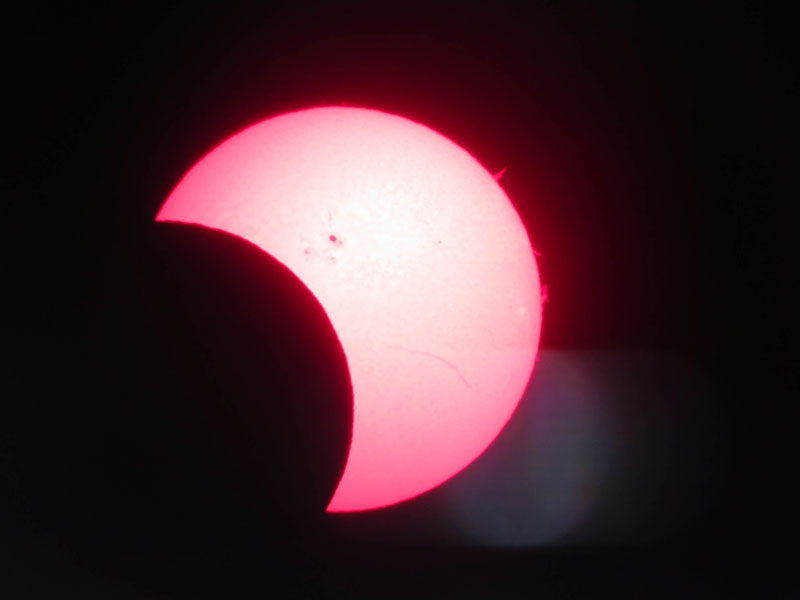 Figure 2-3: An afocal image with a smartphone camera, handheld, of a partial solar eclipse through a Coronado Personal Solar Telescope.
If you're imaging with a telescope and H-alpha filter or a dedicated H-alpha solar telescope, then the camera sensor will see almost completely monochromatic light at 656.3nm. Because most commercial cameras use a three-color (red-green-blue) Bayer filter in front of the sensor, this results in blurry and reddened images. You will get better afocal solar images in H-alpha if you use black and white mode, although the presence of the Bayer filter, and the additional IR filter that's in front of the sensor in many cameras, will still result in some loss of image quality.
While afocal solar imaging is easy and can be done with many cameras, it does have some disadvantages. Because there are many optical elements in the eyepiece and camera lens, there is some image distortion, light loss, and possibly ghost reflections. The images may also be cut off around the edges, an effect known as vignetting, if the camera aperture is too small to capture the full exit pupil of the eyepiece.
9.3 DSLR Solar Imaging
With their bigger sensors, DSLR cameras can be also used for solar imaging to get much better images than smartphones or point-and-shoot cameras. They also accommodate a wide range of interchangeable lenses. Like point-and-shoot cameras, DSLR cameras, when mounted on a tripod, can be used for afocal imaging through a telescope and eyepiece. But far better image quality results when you image through a DSLR camera lens or directly through a telescope.
The image of the Sun will be quite small with DSLR camera lenses of less than 200mm (35mm equivalent). But if you have a zoom lens or a telephoto lens with a focal length longer than 400mm (35mm equivalent) or about 300mm (for crop-sensor or APS-C DSLR cameras), you can get a large enough image of the Sun's disk to see some detail. With such long focal lengths, you will need a solid tripod to hold the camera steady. And unless you are imaging the Sun when it is totally eclipsed by the Moon, you MUST place over the DSLR camera lens a safe solar filter such as the Baader AstroSolar white light solar filters. These filters come mounted in a wide range of sizes to accommodate long and short focal length camera lenses.
Connecting the DSLR camera directly to a solidly-mounted telescope gives you even larger image size since the telescope acts as a very long focal-length camera lens. The DSLR camera body is mounted to the telescope such that the sensor lies at the focal plane of the telescope's lens or mirror. This sort of approach is called prime focus imaging. If you are going to do prime focus imaging of the Sun with a telescope, you MUST use a safe solar filter over the objective of the telescope to prevent damaging your camera or your eyes.
To use a DSLR at prime focus, remove the camera lens and insert a T-ring into the camera's lens mount. These small accessories are made for specific camera types such as Nikon or Canon. The T-ring is then attached to a T-adapter which allows you to insert the camera into the focuser of the telescope.
Once the camera is mounted in the telescope's focuser, you simply aim the filtered scope at the Sun (do NOT look through the finder scope to do this), and bring the image to a focus with the telescope focuser while watching the image on the camera screen or on a computer screen if you're using software to control the camera remotely.
To take an image, use ISO200 or ISO400 and start with a shutter speed in the range of 1/30s to 1/500s. The aperture, of course, is set by the optics of the telescope. Use a shutter release to take the image or trigger the shutter with software to prevent touching (and shaking) the camera.
Which telescope is best for solar imaging with a DSLR? It depends on your goal. Even a focal length of 1000mm to 1200mm shows the full solar disk on a DSLR sensor, so you can't get close-up views of sunspots or prominences, for example, without extending the focal length with a Barlow lens. The solar disk still fills a cropped sensor DSLR camera even at a focal length of about 1700mm and a full-frame DSLR camera at a focal length of 2500mm.
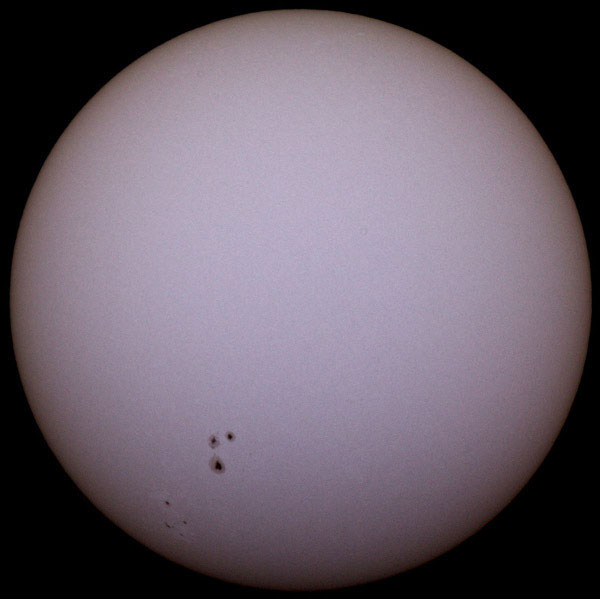 Fig. 3-1: An image of the Sun captured using Baader AstroSolar film. Photo credit: Radoslaw Ziomber.
9.4 Dedicated Astronomy Cameras for Solar Imaging
Most experienced solar and planetary imagers use dedicated astronomy cameras to produce the best images. These cameras have commonly used CCD sensors, although newer cameras are now using less expensive CMOS sensors to achieve very good results. Dedicated astronomy cameras are used at the prime focus of a telescope. They have large and sensitive detectors and electronic shutters, and they can be controlled using dedicated astronomy imaging software such as Firecapture. The best results are obtained with purely monochrome astronomy cameras without a Bayer filter in front of the sensor. Color can be added to the image in post processing. Casual imagers can use one-shot color astronomy cameras for imaging the Sun with white-light filters, though these cameras do not work well in imaging with the narrow bandwidth provided by H-alpha filters.
You can grab a single image of the Sun using a dedicated astronomy camera. But the most common approach with these cameras is to shoot short video clips of the Sun, usually in AVI format, at a rate of 15fps, 30fps, or even 60fps. The clips contain hundreds or thousands of individual digital images which can be analyzed and selected for sharpness during fleeting moments of good seeing during capture. The sharpest images are processed and stacked into a single image using standard imaging software such as RegiStax or AviStack. Stacking works whether you image in white-light, H-alpha, and Ca-K wavelengths. The technique takes a little practice, but it consistently yields results that exceed what was capable with professional equipment just two decades ago.
When trying to get the sharpest solar images with a dedicated astronomy camera and image stacking techniques, it pays to choose a high-quality solar filter that produces as good an image as your telescope will allow. Most H-alpha and Ca-K filters have excellent optical quality and produce good images. To get the best images in white light, a solar wedge (or Herschel wedge) or a filter made with a premium solar film such as Baader's AstroSolar film or Thousand Oaks' Solarlite film is the best choice.
Since capturing AVI video clips of the Sun takes many seconds, you will need to use a well-aligned tracking equatorial mount for imaging. Many motorized equatorial mounts have special tracking rates for the Moon and Sun that are slightly different than the sidereal rate.
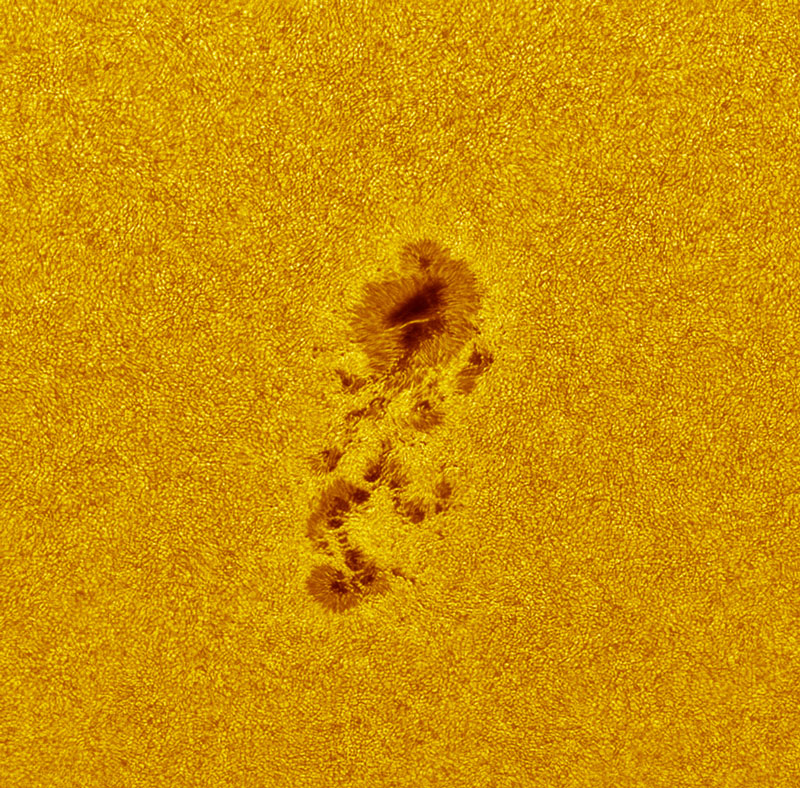 Figure 4-1: A close-up in white light of a sunspot group using a ZWO ASI174 astronomy camera and a telescope with 350mm aperture with an effective focal length of 3556mm. Credit: ZWO.
9.5 A Few Words About Processing
Once you have a digital image of the Sun, you can enhance it with further processing. While astronomical image processing is a big subject with a long learning curve, there are a few straightforward things you can do with applications such as Adobe Photoshop or Gimp.
After adjusting exposure and contrast, if necessary, you can 'stretch' the contrast of the image further by adjusting the levels of the photo. In Photoshop, for example, you can adjust the three sliders for Shadows, Midtones, and Highlights under Adjust>Levels to bring out the subtle but important elements in the image of the Sun's disk without overexposing or dimming the bright and dark areas. Adding a little sharpness can also help bring out fine detail. In Photoshop, use Filter>Sharpen>Unsharp Mask, and use a small radius of three or four pixels.
If you take your image with a monochrome camera in grayscale, you can also add color to the image. This is especially pleasing if you are imaging at H-alpha (in the red-orange part of the spectrum) or Ca-K wavelengths (in the violet). In Photoshop, you begin by converting the grayscale image to RGB color using Image>Mode>RGB Color. You can then adjust the red, green, and blue channels to achieve your desired level of colorization. For example, for H-alpha, you can drag the midpoint of the diagonal line the red channel upward, then drag the diagonal of the green and blue channel downward to produce a golden color to the image. For a grayscale Ca-K image, you can increase the red and blue midpoints and decrease the green midpoint to achieve a violet image.
As mentioned earlier, the exposure settings for capturing detail on the face of the Sun are different than the exposure settings for capturing the prominences at the edge of the Sun. Capturing prominences typically overexposes the detail on the Sun's face, while properly exposing the solar disk underexposes prominences. But if you capture one image of each, you can combine them in Adobe Photoshop so the Sun's disk and the prominences on the limb are both visible.
9.6 Imaging a Solar Eclipse
While the Sun itself often features plenty to observe and image on most clear days, a solar eclipse, when the Moon passes partly or totally across the face of the Sun, presents a wonderful opportunity to capture some dramatic images. A solar eclipse happens somewhere on Earth at least twice and as many as five times each year, but it happens over a restricted range of the Earth's surface. Many observers will travel long distances to see solar eclipses, especially dramatic total solar eclipses. Whether you plan to travel to see an eclipse yourself, or one just happens to pass your way, here are a few tips and ideas to grab a memorable image.
There are three main types of solar eclipse: total, annular, and partial. A total solar eclipse occurs when the Moon passes almost exactly between the Earth and Sun and casts a shadow in a long narrow path across the Earth. An observer within this shadow, which is called the path of totality, will see a total solar eclipse during which the Moon covers the brilliant solar photosphere and reveal the edge of the red chromosphere and white tendrils of the solar corona. A total eclipse just lasts for a few minutes, but it's a memorable event, one you can watch and image---carefully---without the use of a solar filter. Before and after the few minutes of a total eclipse, an observer in the path of totality sees a partial eclipse.
An annular solar eclipse is similar to a total eclipse, but it happens when the Moon is near its furthest point from Earth in its monthly orbit and appears slightly too small to completely cover the Sun's disk. Around the dark Moon appears a thin ring of light from the Sun's photosphere.
A partial solar eclipse occurs when the Earth, Moon, and Sun are not quite lined up and only a segment of the Moon passes across the Sun. A partial solar eclipse is also visible during the time before and after a total or annular solar eclipse, or for an observer outside of the path of totality of a total solar eclipse.
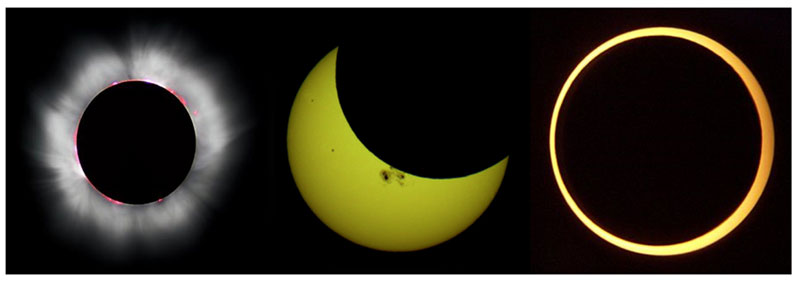 Figure 6-1: The Sun during a total solar eclipse (left), a partial solar eclipse (center), and an annular solar eclipse (right).
Here's an easy but VERY important rule for imaging a solar eclipse: at all times during a partial solar eclipse or annular solar eclipse, you must observe and image the Sun as if there were no eclipse at all. That is, you need to use a safe solar filter in front of your camera lens or telescope objective. Even a sliver of the Sun's brilliant photosphere is bright enough to cause blindness or damage your camera or telescope. The only time you can remove the solar filter---in fact you must remove the solar filter to get any image whatsoever---is during the few minutes of a total solar eclipse when the Sun's bright and blinding disk is covered by the Moon. When the total eclipse ends and the Sun's disk re-emerges from behind the Moon, you must replace the solar filter on your optics to prevent damage to your instruments.
As in the case for imaging the Sun generally, described earlier in this article, to image a total solar eclipse during the brief few minutes of totality, you can use a smartphone camera, a point-and-shoot, a DSLR, or a dedicated astronomy camera. You can shoot through the camera lens, afocally with a smartphone, point-and-shoot, or DSLR, or you can use a DSLR or astronomy camera at the prime focus of a telescope as described earlier.
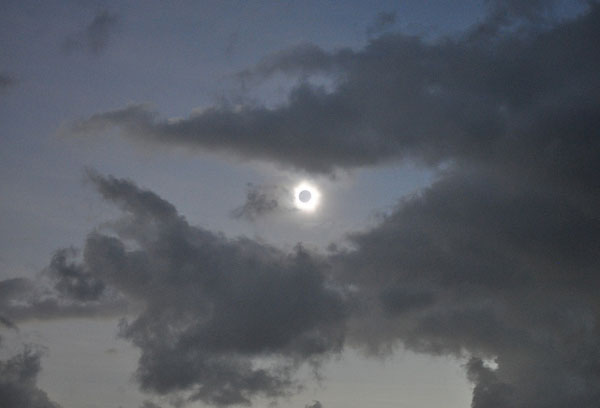 Figure 6-2: A cropped image of a total solar eclipse taken with a DSLR and a 55mm lens at ISO1600, f/4, and 1/15s shutter speed. Image credit: Romeo Durscher/NASA Goddard.
During the few minutes of a total solar eclipse, the main target of your image should be the corona surrounding the Sun, and, depending on your equipment, the surrounding landscape. During a solar eclipse, the corona is about as bright as a full Moon and the surrounding landscape is about as bright as the moments after sunset when the first stars become visible. So there's plenty of light available for the camera when you remove the solar filter. Before the eclipse, you can practice framing and shooting the full Moon and finding approximately the right settings for your camera with this level of lighting. Setting the camera to an ISO of 200-400, the aperture to f/4 or slower, and the shutter speed to a range from 1/1000s to 1/10 of a second will give reasonably good results. Faster shutter speeds will show the brightest part of the inner corona. Slower speeds will overexpose the inner corona but show the fainter tendrils of the outer corona further from the Sun.
The Sun and Moon appear just 0.5° a degree across. That's about half the width of your pinky finger held at arm's length. So to get a close up of the total eclipse you need a lens with a focal length of at least 200mm (35mm equivalent) or 135mm (for APS-C sensors). Longer is better. Focal lengths of 1000mm to 1200mm still show the full totally eclipsed Sun on a DSLR sensor and give you a close-up view of the corona. You want to keep the focal length less than 2000mm (35mm equivalent) or 1300mm (APS-C) to avoid cutting off the corona. With such long focal lengths, you will need a solid tripod to hold the camera steady.
If you don't have a zoom lens or a telescope for your camera, you can try for a wide-field view of the totally eclipsed Sun, the sky, and the surrounding people and landscape. You can also try, before and after the solar eclipse, to take a simple image of the partial eclipse through a safe solar viewing card (see below). It makes for a memorable snapshot.
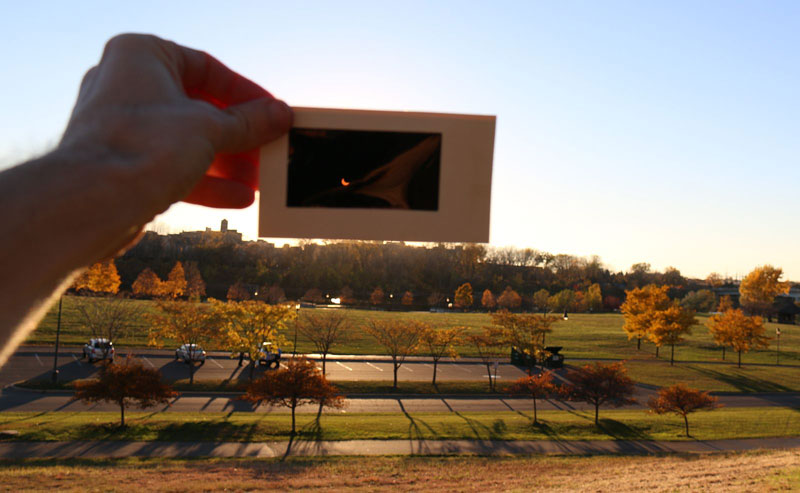 Figure 6-3: The image of a partially eclipsed Sun through a solar viewing card held at arm's length. Image credit: Tom Ruen/Wikipedia Commons.
A few more tips for imaging a total solar eclipse:
- Taking an image of a solar eclipse during the partial phase involves the same consideration as imaging the Sun in general. You MUST use a solar filter over your camera lens or over the objective lens of your telescope or binoculars. If the Sun is too bright to look at with your eyes without a solar filter, it's too bright to image without a solar filter.
- As with visual observation, once the eclipse reaches totality and becomes safe enough to see with your eyes, you can---and must---remove the solar filter from your camera. Otherwise, your camera will not see anything. Once totality ends, if you wish to image the subsequent partial eclipse, you must replace the filter.
- Do not use a flash. It will not help with an image of the eclipse and it's distracting to those around you.
- Don't trust autofocus to work correctly during totality. Focus on the Sun manually through a solar filter before totality, then turn off autofocus before totality begins.
- Practice focusing and taking images during the partial phase of the eclipse before totality begins, or practice weeks in advance on the full Moon.
- Make a checklist of all the equipment you need for the eclipse, especially if you are traveling. Also make a checklist of the steps required to take an image of the eclipse, including the tips in this chapter.
- Use a tripod to get a steadier image. And use a timed or remote shutter release to avoid camera shake.
- And don't forget: when the Sun starts emerging from behind the Moon, put your filters back on your camera lens or telescope, and stop looking at the eclipse directly with your eyes without a safe solar filter.
Finally, here's a counterintuitive tip. If you've never before seen a total solar eclipse, consider skipping imaging altogether and just watch the few minutes of totality with your unaided eye. It will be one of the most spectacular events you will ever see, so you don't want to spend time fiddling with your camera during this fleeting opportunity. Most total solar eclipses are imaged by hundreds of expert photographers, and you can see their work afterward. Just enjoy the show.
<< Previous Article: 8 Next Article: Coming Soon >> About the Author
Brian Ventrudo is a writer, scientist, and astronomy educator. He received his first telescope at the age of 5 and completed his first university course in astronomy at the age of 12, eventually receiving a master's degree in the subject. He also holds a Ph.D. in engineering physics from McMaster University. During a twenty-year scientific career, he developed laser systems to detect molecules found in interstellar space and planetary atmospheres, and leveraged his expertise to create laser technology for optical communications networks. Since 2008, Brian has taught astronomy to tens of thousands of stargazers through his websites OneMinuteAstronomer.com and CosmicPursuits.com.
 About the Author
Manish Panjwani has been an active amateur astronomer since before Halley's Comet last flew by our neighborhood. A former wireless communications consulting engineer and management consultant to various Fortune 500 companies, Manish started Agena AstroProducts in 2003. Since then, Agena has become one of the leading online retailers of telescopes and astronomical accessories worldwide. Besides observing from his heavily light polluted backyard in Los Angeles, Manish enjoys conducting astronomy outreach programs in local schools. Manish also holds a Master's degree in Electrical Engineering from Virginia Tech and an MBA from the Kellogg School of Management at Northwestern University.
***
This article is © AstronomyConnect 2017. All rights reserved.
Dismiss Notice
New Cookie Policy
On May 24, 2018, we published revised versions of our Terms and Rules and Cookie Policy. Your use of AstronomyConnect.com’s services is subject to these revised terms.