Overview
In the first article in this series on solar observing, you learned the basics of how the Sun works along with an overview of what you can see on the visible face of the Sun. You also discovered the difference between narrowband (such as H-alpha) and broadband (or white light) solar filters and how they influence what you can see on and around the Sun. In this article, you get down to business by learning the three main approaches to visual solar observation: filtered naked-eyed observation, solar image projection with a telescope or binoculars, and filtered observation with white-light or narrowband solar filters with a telescope or binoculars. Each method differs by cost of equipment and by access to detail on the visible face of the Sun. But all three techniques belong in the toolkit of every amateur solar astronomer.
2. Important Safety Tips for Solar Observation
First, an important word about safety. Solar observing is the most potentially hazardous activity for amateur astronomers in an otherwise fairly safe pastime. Looking at the Sun just with your naked eye is dangerous enough. But looking at the Sun through a telescope or binoculars without a proper solar filter is a sure way of going blind in less time than it takes to blink. Equipment manufacturers and astronomers have developed a number of filter technologies that allow safe solar viewing. To make sure you don't make a dangerous mistake when trying to observe the Sun, here are some things you should NEVER do:
- Never look at the Sun directly with your eyes without a safe solar filter, even with your unaided eye, even through thick haze, for any length of time.
- Never look at the Sun through a telescope, even your finder scope, without a proper filter. Although you may at first feel no pain when you look at the unfiltered Sun because your retina has no nerve endings, you will be permanently blinded almost instantly if you look at the Sun through any size telescope.
- Never leave a telescope unattended outside in the daylight, especially around children, unless caps or solar filters are securely placed over the main objective and the finder objective. At the sight of a telescope, the curious and uninformed just might try a little solar observing, either accidentally or deliberately. You should treat a telescope in daylight like a loaded gun.
- Never use a solar filter designed to thread into the eyepiece of an otherwise unfiltered telescope. These filters are often supplied with cheap "department store" telescopes. All the light from the Sun is focused through the telescope onto these little filters which eventually crack or melt and allow concentrated sunlight to suddenly hit your eye. A proper solar filter removes most of the light and heat from the Sun before it enters the telescope at the objective lens or mirror. This video shows how quickly these filters can crack.
- Never use as a solar filter smoked glass, sunglasses, layers of photographic film, photographic filters, sheets of Mylar from a camping blanket, Pop-Tart wrappers, or the bottom of a beer bottle to observe the Sun. None of these will protect you sufficiently.
2.1 Solar Observing Without a Telescope
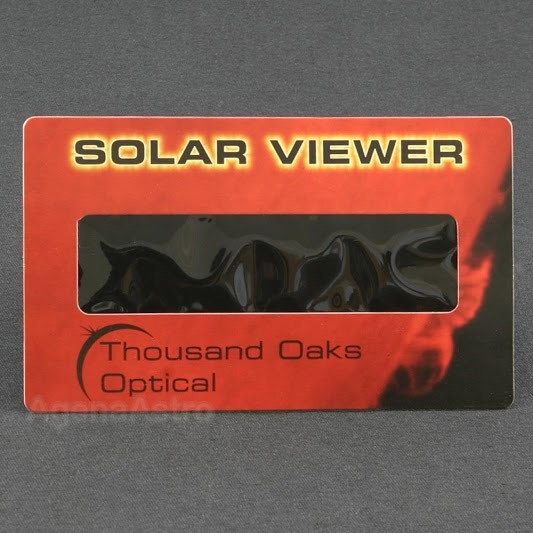
Using safe but inexpensive white-light solar filters in front of your eyes, you can simply look towards the Sun and see the Sun's photosphere, the outer layer of the solar atmosphere from which light escapes into space. Such filters come in the form of mounted sheets of specialized dark plastic in the form of solar viewing cards or "eclipse glasses". Even small sheets of sufficiently dense #14 welder's glass work well. These filters cost as little as a few dollars yet they reduce the dangerous light and heat from the Sun to a safe level.
SAFETY NOTE: Do NOT use eclipse glasses, solar viewing cards, or #14 welding glass to view the Sun through an otherwise unfiltered telescope. These devices are intended for use with the naked eye only. The concentrated image of the Sun can quickly damage these devices and result in permanent eye damage.
With only these simple and low-cost white light filters, the Sun's disk and large sunspot groups can easily be resolved. During a solar eclipse, the disk of the Moon as it slowly passes across the Sun becomes visible with these filters, as does the disk of Venus when it passes across the face of the Sun, an event known as a transit. Smaller sunspot groups, solar granulation, faculae, the disk of Mercury as it transits the Sun, and other small features cannot be resolved. Features such as solar prominences, no matter how large, are not visible with simple eclipse glasses and solar cards, or with any white-light filters. They are visible only with narrowband H-alpha filters and a telescope.
2.2 Projecting the Sun's Image
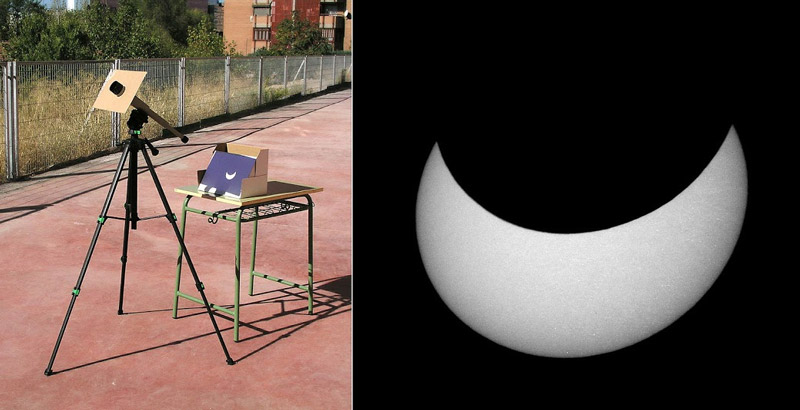
Projecting the image of the Sun from a telescope is another straightforward and inexpensive method to observe the Sun in white light. The projection method dates back nearly to the invention of the telescope itself. In its simplest form, the technique simply involves holding a thick piece of paper or cardboard a foot or two behind the eyepiece of the telescope when the scope is aimed at the Sun and brought to focus. The image from the eyepiece projects onto the paper screen. The greater the distance from the eyepiece to the screen, the larger the image. That's all there is to it.
To get a projected view on the screen with good contrast, place a small diaphragm made of cardboard over the top or bottom of the telescope tube to block unwanted sunlight from falling onto the screen. No other special equipment is required for this method, though some vendors sell a white screen and a mechanical holder that fixes on the back of the telescope or focuser to hold the screen in place.
You can also use a pair of binoculars mounted on a tripod-- with a cap placed over one of the two objective lenses-- to project the image of the Sun onto a screen. However, with binoculars, it's best to observe the Sun for only a few minutes at a time because the Sun's heat can damage the adhesive used to hold in place the glass prisms inside the sealed optical tube of the binoculars. With magnification of 7x to 10x, binoculars show much more on the Sun's disk than the unaided eye, but they are still limited compared to a telescope in terms of how much they can enlarge solar features such as sunspots, plages, and faculae.
SAFETY NOTE: When using the projection technique with telescopes or binoculars, remember the full intensity of the Sun is coming out of the eyepiece. So make sure no one, especially a small child, walks up and looks through it. For the same reason, it's also good practice to cover the finder scope of a telescope during a solar observing session.
The simple projection method works well for obtaining low-magnification and full-disk views of the Sun, larger sunspot groups, light-colored faculae, and for watching sunspots move across the face of the Sun each day during the Sun's 26-day rotation period. The method is also well suited for showing the Sun's disk to larger groups of observers, especially during partial solar eclipses.
Because the telescope is unfiltered when using the projection method and the Sun's full intensity falls into the optics, this method is best suited for small refractors or Newtonian reflectors of less than 3" to 4" aperture. Larger telescopes collect too much light and heat which may result in damage to the eyepiece. The projection method should be avoided with Schmidt-Cassegrain and Maksutov-Cassegrain telescopes. These instruments, which almost always have apertures larger than 4", will suffer heat build-up inside their sealed tubes leading to degraded views and perhaps permanent damage of the instrument.
The projection method also points the way to the simplest technique of all to observe the Sun: a pinhole camera. Just poke a tiny hole in a piece of cardboard or a thick piece of paper, aim the card at the Sun, and project the image onto a second piece of paper at least a foot away. This approach yields a small and faint image of the Sun, but it can reveal larger sunspot groups and the progress of a partial solar eclipse. Sometimes, during a partial eclipse, you can see multiple images of the eclipsed Sun cast onto the ground by the pinhole gaps between leaves on a tree.

2.3 Using Solar Filters with a Telescope – An Overview
You get the best views of the Sun using a solar filter mounted over the objective lens or mirror of an astronomical telescope. A solar filter reduces the brilliant light and heat from the Sun before entering the telescope and allows you to get safe, high-magnification views of the Sun's disk using the same eyepieces and accessories you use for observing objects in the night sky. A solar filter is not usually included as a standard accessory with a telescope.

As mentioned in the first article in this series, there are two main types of solar filter: broadband or white-light filters and narrowband filters such as H-alpha. Broadband or white-light filters are the simplest and least expensive type of solar filter. They are made from reflective glass or sheets of Mylar or a more specialized optical film and mounted in a cell that fits over the objective of a telescope. They reduce the intensity of the Sun's heat and light by a factor of 100,000 or more. Once the solar filter is mounted on the telescope, an observer selects a standard astronomical eyepiece to get the best magnification to see sunspots, granulation, faculae, and other features in the Sun's photosphere.
White-light solar filters are available for most astronomical telescopes. Including a mounting cell, such filters cost $30-$200 depending on their size and configuration. You will learn more about white-light solar filters in the next article in this series.
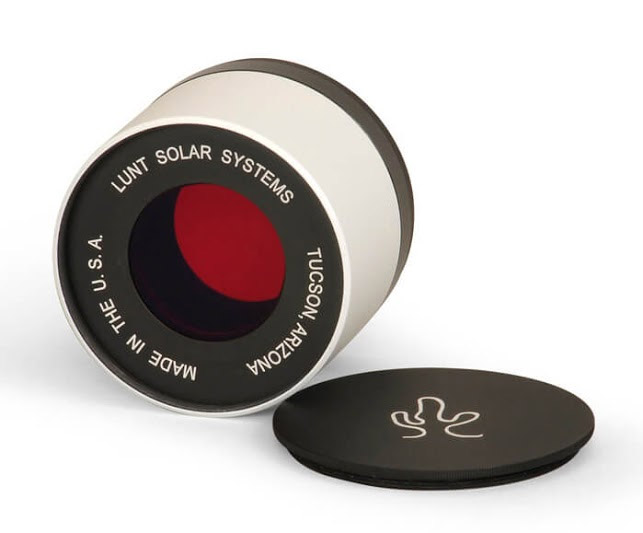
The most striking views and images of the Sun are obtained with H-alpha and other narrowband solar filters. An H-alpha filter, the most commonly used narrowband filter by amateur astronomers, gives a view of hydrogen atoms in the chromosphere, a region of the Sun's atmosphere above the much brighter photosphere. These filters enable views of solar features that are not visible with broadband solar filters including solar prominences and filaments, which are large arcs of hydrogen gas suspended in magnetic fields above the limb of the Sun, bright plages above sunspots, and Ellerman bombs, fleeting events associated with solar magnetic fields breaking through into the photosphere and chromosphere.
H-alpha filters are available as accessories for some types of astronomical telescopes, usually small refractors. A temperature-compensated mechanical cell holds the filter element and mounts on the telescope tube. The mounting cell may also include a manual control mechanism to tune slightly the center of the passband of the filter above and below the nominal H-alpha wavelength of 656.3 nm. Tuning results in better contrast of many features in the Sun's chromosphere.
All H-alpha solar filters must be paired with a solar diagonal in place of a star diagonal. The solar diagonal further reduces unwanted light and heat from the optical path before the Sun's image reaches the eyepiece. The downside of H-alpha and other narrowband solar filters? The cost. Such filters along with their mounting cells and solar diagonals cost $1,000-$3,000 or more depending on the aperture and passband. Narrower passbands give more striking views, but they cost much more.
A later article in this series gives more information and suggestions on selecting and using H-alpha and other narrowband filters for solar observation.
2.4 Telescope Aperture and Solar Observing
Which telescope works best for solar observing? When observing faint objects in the night sky, of course, a larger-aperture telescope is usually better. Bigger lenses and mirrors collect more light and make for brighter images, and they give greater resolution to bring out finer detail in planets, the Moon, and deep-sky objects. When observing the Sun, image brightness is not a problem, of course, so a larger telescope is not a necessity to see many solar features. Larger aperture does improve resolution of fine detail on the Sun, but it comes with the need for a larger solar filter, and larger filters are more expensive. Larger telescope tubes also suffer more from the effects of thermal air currents within the tube and from the degrading effects of atmospheric turbulence. The Earth's atmosphere is particularly unstable during the day. While white-light filters, in particular, are available for most telescopes, experienced solar observers suggest the trade off between resolution, air currents, atmospheric seeing, and cost favors the use of telescopes with an aperture of less than 6" (150mm).
In the next article in this series, you get a detailed overview of the types of white-light solar filters available for observing the Sun with a telescope and binoculars.